Maple Donut Bars: 10 Easy Steps to Soft, Sweet Perfection
If you’re looking for a delightful treat that brings warmth and joy to your kitchen, you’ve come to the right place! These Maple Donut Bars: 10 Easy Steps to Soft, Sweet Perfection are not just any dessert; they are a nostalgic hug in bar form. The combination of maple syrup and warm spices creates an inviting aroma that fills the home, making it impossible not to smile. Whether it’s a busy weeknight or a leisurely weekend brunch, these bars are perfect for sharing with family or enjoying all by yourself.
What makes these donut bars so special? It’s their simplicity and versatility. They can be whipped up quickly and easily, making them ideal for any occasion. Plus, who can resist that soft texture topped with a sweet glaze? Trust me, once you try them, they’ll become a staple in your recipe book.
Why You’ll Love This Recipe
- Quick and easy preparation: With just 10 simple steps, you’ll have delicious bars ready in no time!
- Family-friendly treat: Kids and adults alike will love the sweet maple flavor—perfect for breakfast or snack time.
- Make-ahead convenience: Bake a batch ahead of time and enjoy them throughout the week. They stay fresh for days!
- Delicious flavor profile: The blend of maple syrup and warm spices creates an irresistible taste that feels like home.
- Versatile serving options: These bars pair beautifully with coffee, tea, or even as an after-dinner dessert!
Ingredients You’ll Need
Let’s gather some simple and wholesome ingredients to make our Maple Donut Bars. These are pantry staples that you probably already have on hand!
- 2 cups all-purpose flour
- 1 cup granulated sugar
- 2 teaspoons baking powder
- ½ teaspoon baking soda
- ½ teaspoon salt
- 1 teaspoon ground cinnamon
- ½ teaspoon ground nutmeg
- 1/2 cup whole milk
- 2 large eggs
- ¼ cup unsalted butter, melted
- 2 teaspoons vanilla extract
- ¼ cup maple syrup (for the batter)
- ¼ cup maple syrup (for the glaze)
- 1 cup powdered sugar
Variations
This recipe is wonderfully flexible! You can easily customize it to suit your taste or dietary needs.
- Add nuts: Toss in some chopped walnuts or pecans for added crunch and flavor.
- Use different spices: Experiment with pumpkin pie spice or ginger for a unique twist on the classic flavors.
- Mix in chocolate chips: For an indulgent treat, fold in some semi-sweet chocolate chips before baking.
- Try different glazes: Swap out the maple glaze for a chocolate glaze or a simple lemon icing for a refreshing change.
How to Make Maple Donut Bars: 10 Easy Steps to Soft, Sweet Perfection
Step 1: Preheat Your Oven and Prepare the Pan
Start by preheating your oven to 350°F (175°C). This ensures that your donut bars bake evenly. While that’s heating up, grease a 9×9-inch baking dish with cooking spray or butter to help prevent sticking.
Step 2: Mix Dry Ingredients
In a medium-sized bowl, whisk together the flour, sugar, baking powder, baking soda, salt, cinnamon, and nutmeg. Mixing these dry ingredients first helps distribute the leavening agents evenly throughout your batter.
Step 3: Combine Wet Ingredients
In another bowl, whisk together the milk, eggs, melted butter, vanilla extract, and maple syrup. This mixture adds moisture and flavor to your bars—creating that delightful maple taste we all adore!
Step 4: Incorporate Wet and Dry Ingredients
Now it’s time to bring everything together! Slowly add the wet ingredients into the dry ingredients while stirring gently until combined. Be careful not to overmix; this helps keep your bars light and fluffy.
Step 5: Pour the Batter into the Pan
Pour your batter into the prepared baking dish. Use a spatula to spread it evenly across the pan—it’s important for ensuring uniform baking!
Step 6: Bake the Donut Bars
Pop those bars into your preheated oven! Bake them for about 25-30 minutes or until a toothpick inserted into the center comes out clean. A golden top signals they’re ready!
Step 7: Make the Maple Glaze
While your donut bars are baking away blissfully, whisk together powdered sugar and maple syrup in a small bowl until smooth. If it’s too thick for drizzling later on, don’t hesitate to add a little more maple syrup.
Step 8: Cool the Donut Bars
Once baked, let them cool in the pan for about 10 minutes before transferring them to a wire rack. This slight cooling period helps firm them up—a crucial step for easy slicing later.
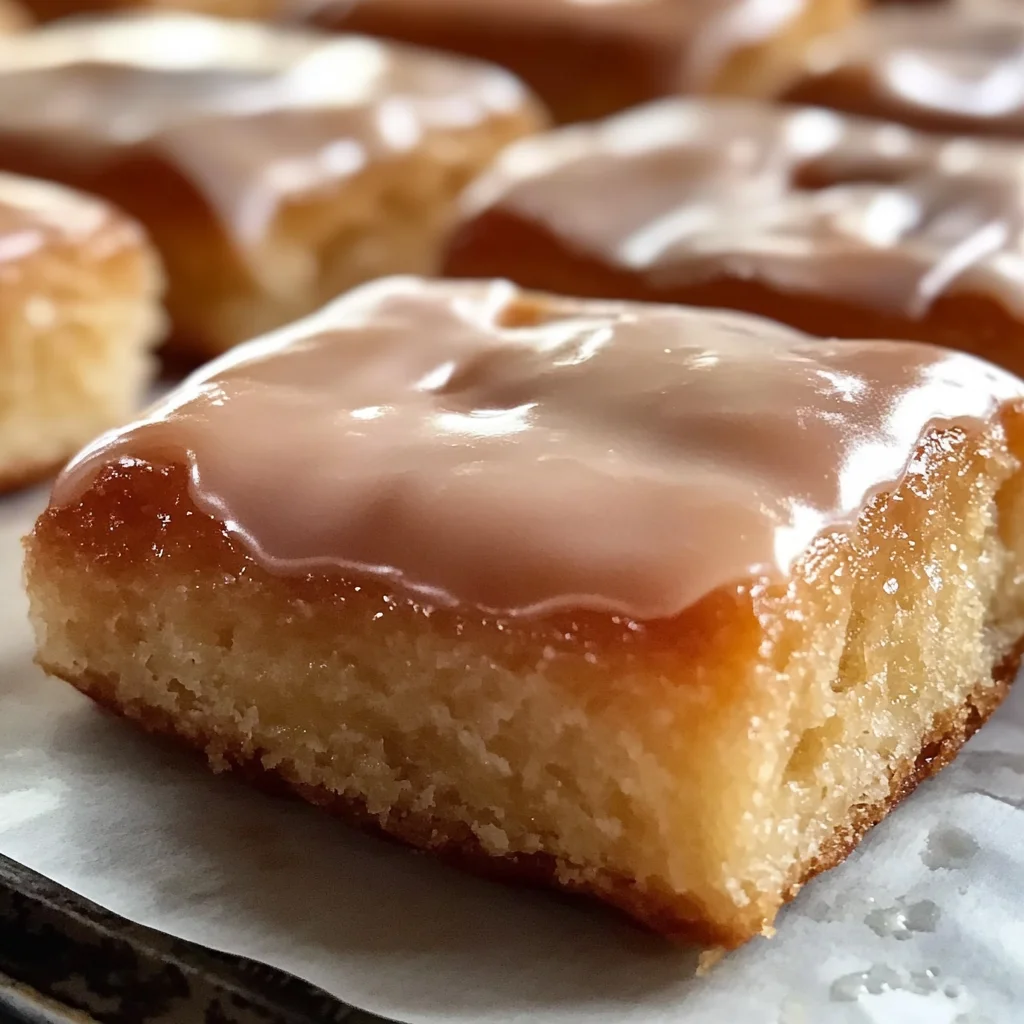
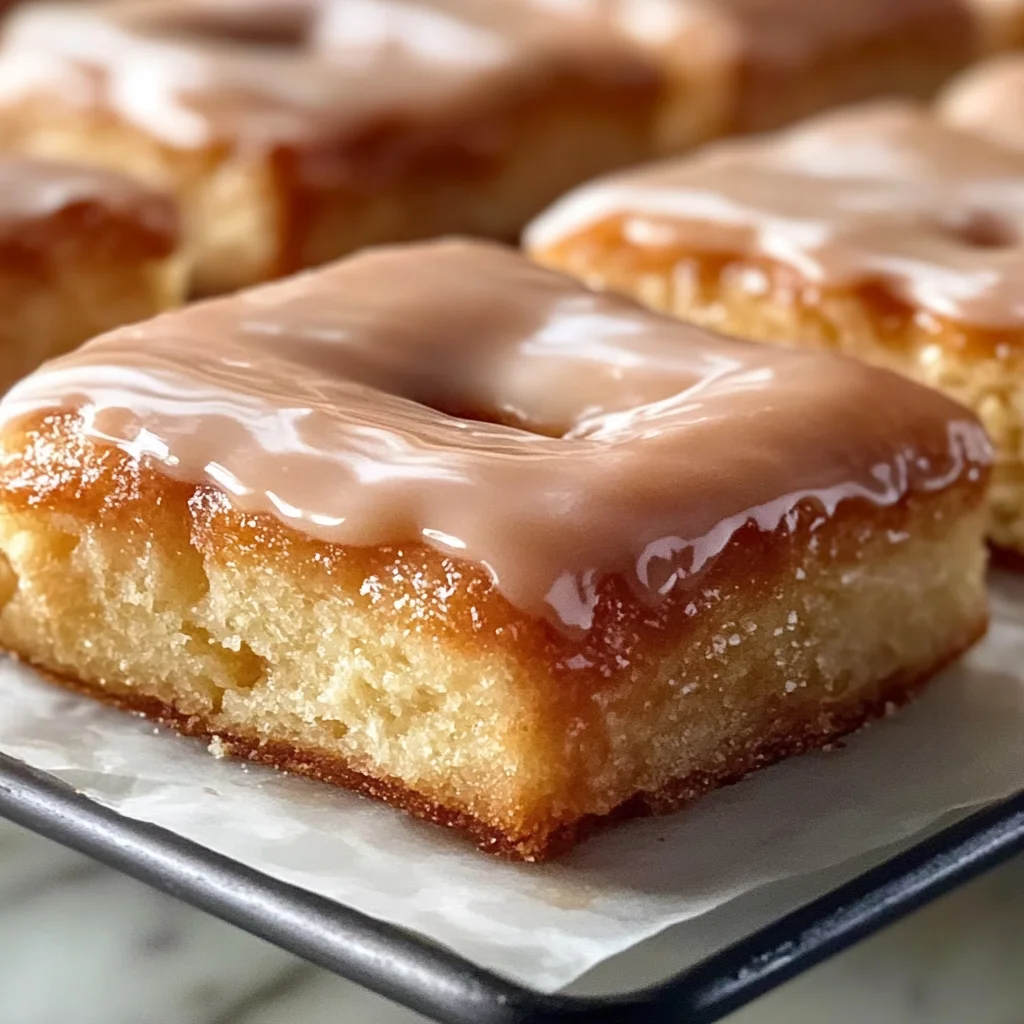
Step 9: Glaze the Bars
After cooling slightly but still warm enough to absorb flavor, drizzle that luscious maple glaze generously over the top of your donut bars. Waiting just a few minutes allows it to set perfectly.
Step 10: Serve and Enjoy
Slice those beautiful donut bars into squares and serve! Whether paired with coffee or enjoyed solo while curled up on the couch—they’re sure to bring smiles all around.
Now you have everything you need to create scrumptious Maple Donut Bars at home! Enjoy every bite of this cozy treat!
Pro Tips for Making Maple Donut Bars: 10 Easy Steps to Soft, Sweet Perfection
Baking is a delightful adventure, and with these simple tips, you can ensure your maple donut bars turn out perfectly every time!
-
Use room temperature ingredients: Bringing your eggs and milk to room temperature helps create a smoother batter, ensuring your donut bars rise beautifully and have a tender crumb.
-
Don’t overmix the batter: Gently mixing the wet and dry ingredients until just combined prevents the development of gluten, which can result in dense bars. A light hand will keep your donut bars soft and fluffy!
-
Check for doneness early: Ovens can vary in temperature, so start checking your bars a few minutes before the suggested baking time. A toothpick should come out clean when they’re done—this ensures they won’t dry out.
-
Let them cool before glazing: Allowing the bars to cool slightly before applying the glaze helps it adhere better, creating a beautiful finish that won’t slide off. Plus, it avoids burning your fingers!
-
Store properly for freshness: Keep any leftovers in an airtight container at room temperature to maintain their softness. If you want them to last longer, consider freezing them for up to three months.
How to Serve Maple Donut Bars: 10 Easy Steps to Soft, Sweet Perfection
Serving your maple donut bars can be just as fun as making them! Here are some ideas to elevate your presentation and make these treats even more enjoyable.
Garnishes
- Chopped nuts: Sprinkle some finely chopped walnuts or pecans on top of the glaze for added crunch and flavor.
- Fresh fruit slices: Serve with slices of strawberries or bananas to add a fresh touch that balances the sweetness of the bars.
Side Dishes
- Freshly brewed coffee: The rich flavors of coffee complement the sweet maple perfectly. Consider offering a variety like espresso or cold brew for different tastes.
- Herbal tea: A soothing cup of chamomile or mint tea pairs beautifully with these sweet treats, providing a delightful contrast.
- Yogurt parfait: Layer yogurt with granola and berries for a refreshing side that adds creaminess and tartness alongside the sweetness of the donut bars.
- Fruit salad: A light bowl of mixed seasonal fruits offers a refreshing counterpoint to the rich flavor of maple donuts while adding vibrant color to your table.
With these serving suggestions in mind, you’ll create an inviting spread that showcases your delicious maple donut bars at their best!
Make Ahead and Storage
These maple donut bars are perfect for meal prep! Making a batch in advance means you can enjoy a delicious treat whenever the craving strikes. Here’s how to store them properly:
Storing Leftovers
- Allow the bars to cool completely before storing.
- Place them in an airtight container to maintain freshness.
- Keep at room temperature for up to 3 days, or refrigerate for up to a week.
Freezing
- Cut the bars into squares before freezing for easy access.
- Wrap each square tightly in plastic wrap and then place them in a freezer-safe bag or container.
- Freeze for up to 2 months.
Reheating
- To enjoy your frozen bars, simply remove them from the freezer and let them thaw at room temperature for about 30 minutes.
- For a warm treat, microwave each bar for about 10-15 seconds until warmed through.
FAQs
Got questions? We’ve got answers! Here are some common inquiries about these delightful maple donut bars:
Can I make Maple Donut Bars: 10 Easy Steps to Soft, Sweet Perfection gluten-free?
Absolutely! You can substitute all-purpose flour with a gluten-free flour blend. Just ensure that it has a binding agent like xanthan gum for the best texture.
How do I ensure my Maple Donut Bars stay soft?
To keep your maple donut bars soft, avoid overbaking them. They should be lightly golden on top and toothpick tested should come out clean but not dry.
Can I use different flavors instead of maple?
Yes! Feel free to swap out maple syrup with other flavored syrups or extracts like vanilla or almond for a unique twist on this recipe.
What’s the best way to store Maple Donut Bars: 10 Easy Steps to Soft, Sweet Perfection?
Store your leftover bars in an airtight container at room temperature for up to 3 days or refrigerate them for up to a week.
Can I add toppings or mix-ins?
Certainly! Chopped nuts, chocolate chips, or even sprinkles can be added to the batter before baking or sprinkled on top of the glaze for extra flair!
Final Thoughts
I hope you find joy in making these Maple Donut Bars: 10 Easy Steps to Soft, Sweet Perfection! The sweet aroma that fills your kitchen is just one of the many reasons why this recipe is special. Whether it’s a cozy breakfast or an afternoon snack, these bars are sure to bring smiles all around. Enjoy every bite and feel free to share your experiences—I’d love to hear how they turn out!
Maple Donut Bars: 10 Easy Steps to Soft, Sweet Perfection
If you’re in search of a heartwarming treat that fills your home with delightful aromas, these Maple Donut Bars are just the ticket! With their soft texture and sweet maple flavor, they evoke feelings of nostalgia and comfort. Whether you enjoy them for breakfast, as an afternoon snack, or share them at gatherings, these bars are simple to make and even easier to love. In just 10 straightforward steps, you can whip up a batch that will become a cherished staple in your recipe collection.
- Prep Time: 15 minutes
- Cook Time: 30 minutes
- Total Time: 45 minutes
- Yield: Approximately 12 servings 1x
- Category: Dessert
- Method: Baking
- Cuisine: American
Ingredients
- 2 cups all-purpose flour
- 1 cup granulated sugar
- 2 teaspoons baking powder
- ½ teaspoon baking soda
- ½ teaspoon salt
- 1 teaspoon ground cinnamon
- ½ teaspoon ground nutmeg
- ½ cup whole milk
- 2 large eggs
- ¼ cup unsalted butter, melted
- 2 teaspoons vanilla extract
- ¼ cup maple syrup (for the batter)
- ¼ cup maple syrup (for the glaze)
- 1 cup powdered sugar
Instructions
- Preheat your oven to 350°F (175°C) and grease a 9×9-inch baking dish.
- In a medium bowl, whisk together flour, sugar, baking powder, baking soda, salt, cinnamon, and nutmeg.
- In another bowl, mix milk, eggs, melted butter, vanilla extract, and maple syrup.
- Combine wet ingredients into dry ingredients gently until just mixed.
- Pour the batter into the prepared pan and spread evenly.
- Bake for about 25-30 minutes until golden; a toothpick should come out clean.
- While baking, prepare the glaze by mixing powdered sugar and maple syrup until smooth.
- Allow bars to cool for about 10 minutes before transferring them to a wire rack.
- Drizzle warm bars with glaze.
- Slice into squares and serve.
Nutrition
- Serving Size: 1 square (45g)
- Calories: 180
- Sugar: 14g
- Sodium: 130mg
- Fat: 6g
- Saturated Fat: 3g
- Unsaturated Fat: 2g
- Trans Fat: 0g
- Carbohydrates: 29g
- Fiber: <1g
- Protein: 3g
- Cholesterol: 40mg